Saturday 7 April 2012

Iced Baked Bunnies

Day 40 - Iced Baked Bunnies

Well, here we are - Day 40, my last project.  I've decided to bake again and today I'm making iced baked bunnies.  The baked bunnies are really just bread and I'm cheating a little by using a 'simply add water' bread mix.

I've made the mix as recommended on the packet and definitely added the optional butter. Having kneaded the bread for a full ten minutes I've first torn off balls of dough and rolled them out into long thin sausage shapes.  I'm really not sure how large the bunnies will end up being so I've made a mixture of sizes.

I've then made a twist in the middle of the dough leaving a hole in the middle. This is the bunny body.


I've made a second twist above the first but this time left no hole - this will be the bunny head and ears.
Lastly I've filled the hole with a small ball of dough to be the bunny tail.


Currently I've left the bunnies on baking trays, covered with clean tea towels, to rise before I can cook them.  I'll be putting them in the oven in about an hour.

In fact they did rise quite a bit!


Now they're out of the oven, I've left them to cool before glazing them with a little icing. Another tasty treat!
Some look like bunnies more than others!


Friday 6 April 2012

Easter Pom-Pom Pals

Day 39 - Easter Pom-Pom Pals

I've just taken the willow crosses (Day 38) to church this morning.  They were very gratefully received and I can't wait to see them used in the Easter display.  However, the large cross took between five and six hours to make and I've therefore decided that the last two days should be a little less time consuming! Besides it will let me catch up completely on any remaining orders.

I'd not really planned today's project but was confident I'd have everything I'd need to make Easter pom-pom pals.  After seven years running crafts at a toddler group, many days spent crafting with our own children and working as a teaching assistant, I've got quite a stash of craft materials! 


I was pleased to have a couple of able assistants - both eldest and youngest daughters. Our youngest daughter cut circular bases from green glitter self-adhesive foam.  This means you will be able to stick them where you like, if you like. 


There's not too much detail to this craft.  The photos show how we built up the pom-pom chicks and bunnies using pom poms, feathers, stick on googly eyes, wool, felt, pipe cleaners and a selection of funky foam flowers and Easter egg shapes (which I had left over from last year).


Can you see the tail?


The only tricky bit was attaching the ears.  I cut the pipe cleaner in half and then I've twisted it tightly around the centre of the pom-pom, leaving the ends of the pipe cleaner sticking out of the top. I've then bent the pipe cleaners down to form ear shapes.  


I think they all look quite cute!


My living room is now looking a little less cluttered as I have been able to tidy away almost all the craft materials I have been using over the last forty-six days.  My final 40days challenge - tomorrow - doesn't need much supplies!

I'm still wondering what I'm going to do after the 40days project has finished - any suggestions??

Thursday 5 April 2012

Willow Weaving

Day 38 - Willow Weaving

This is what my bath has looked like for the last few days..........


I've been soaking willow to make it pliable enough for today's craft.  Although our school has often used willow to make various structures, I personally have never undertaken a large project. By mid-morning I should know whether it's going to work for me or not! At this point I'd like to say a personal thank you to school for donating the willow for this project.

I've decided to make a large cross to form part of the church's Easter flower display.  Of course I hope the church will be able to use this willow weaving for other future displays as well - which is why I'm not making a rabbit! The other reason being I haven't a clue how I'd even begin to weave a rabbit.  For a cross I thought I'd start by making two rectangular frames - one short, one long - and tying them together to form a cross.  This in itself was harder than I thought it'd be. 


My general tactic was to bend the willow around the frame in large zig zags, trying to wrap it over and under itself as well. By mid-morning I was seriously beginning to doubt whether this was ever going to work.  The willow wouldn't stay put, I couldn't figure out how to tie the ends in to anything and it was extremely difficult trying to stay to the cross shape.   In fact I later gave up trying to keep the bottom of the cross frame together and decided to concentrate on weaving the top part.  


Well, I persevered. I decided to let the willow bend where it was most happy bending and I left some of the ends sticking out, figuring I would simply snip them off later.  Eventually I began to see progress and the top of the cross began to come together.  


Happier now I moved on to tackle the bottom of the cross.  I did find that the more weaving there is the easier it becomes as there are more points to secure and wrap the willow.  


As I've said the original shape didn't really work out and I spent hours twisting, bending, snipping, weaving and wrapping more and more strips of willow around the cross until I was entirely happy with the shape from all sides.  As a last thought I decided to wrap about eight willow strips in a hoop around the neck of the cross and these came  together nicely on the front. What an effort! Here is the finished cross taken in our garden..


Looking back I'm not sure that the willow had soaked for long enough however the project had to be done today as the church would need it tomorrow.   Some of the willow snapped as I bent it, but more didn't than did.

It was also great exercise as I lost count of the number of times I raced up the stairs to get another two strips of willow from the bath tub.  The willow dries out so quickly that I never got more than three pieces out at a time.

2 days to go!!!!

Update: Here are some photos of the willow crosses decorated for Easter....


As well as the large willow cross I made these quick small willow crosses which look lovely as a 'hill far away'.

Thank you to the flower arrangers at the church for incorporating them in such a beautiful way.


Wednesday 4 April 2012

Miniature Garden

Day 37 - Miniature Garden/Mod-roc

For today's craft I'm incorporating two crafts - possibly three if you count recycling! My initial idea was to create just one truly, authentic miniature garden of Gethsemane. However during the day I changed my mind and decided to create four not-quite-so mini and not-quite-so authentic gardens instead, hoping to make sales of at least three of them.

I collected or bought everything I'd need: decorative stone/gravel that I already had; mini plants from a garden centre; moss, stones and soil from our garden; Mod-roc and some empty packaging from my junk modelling stash.


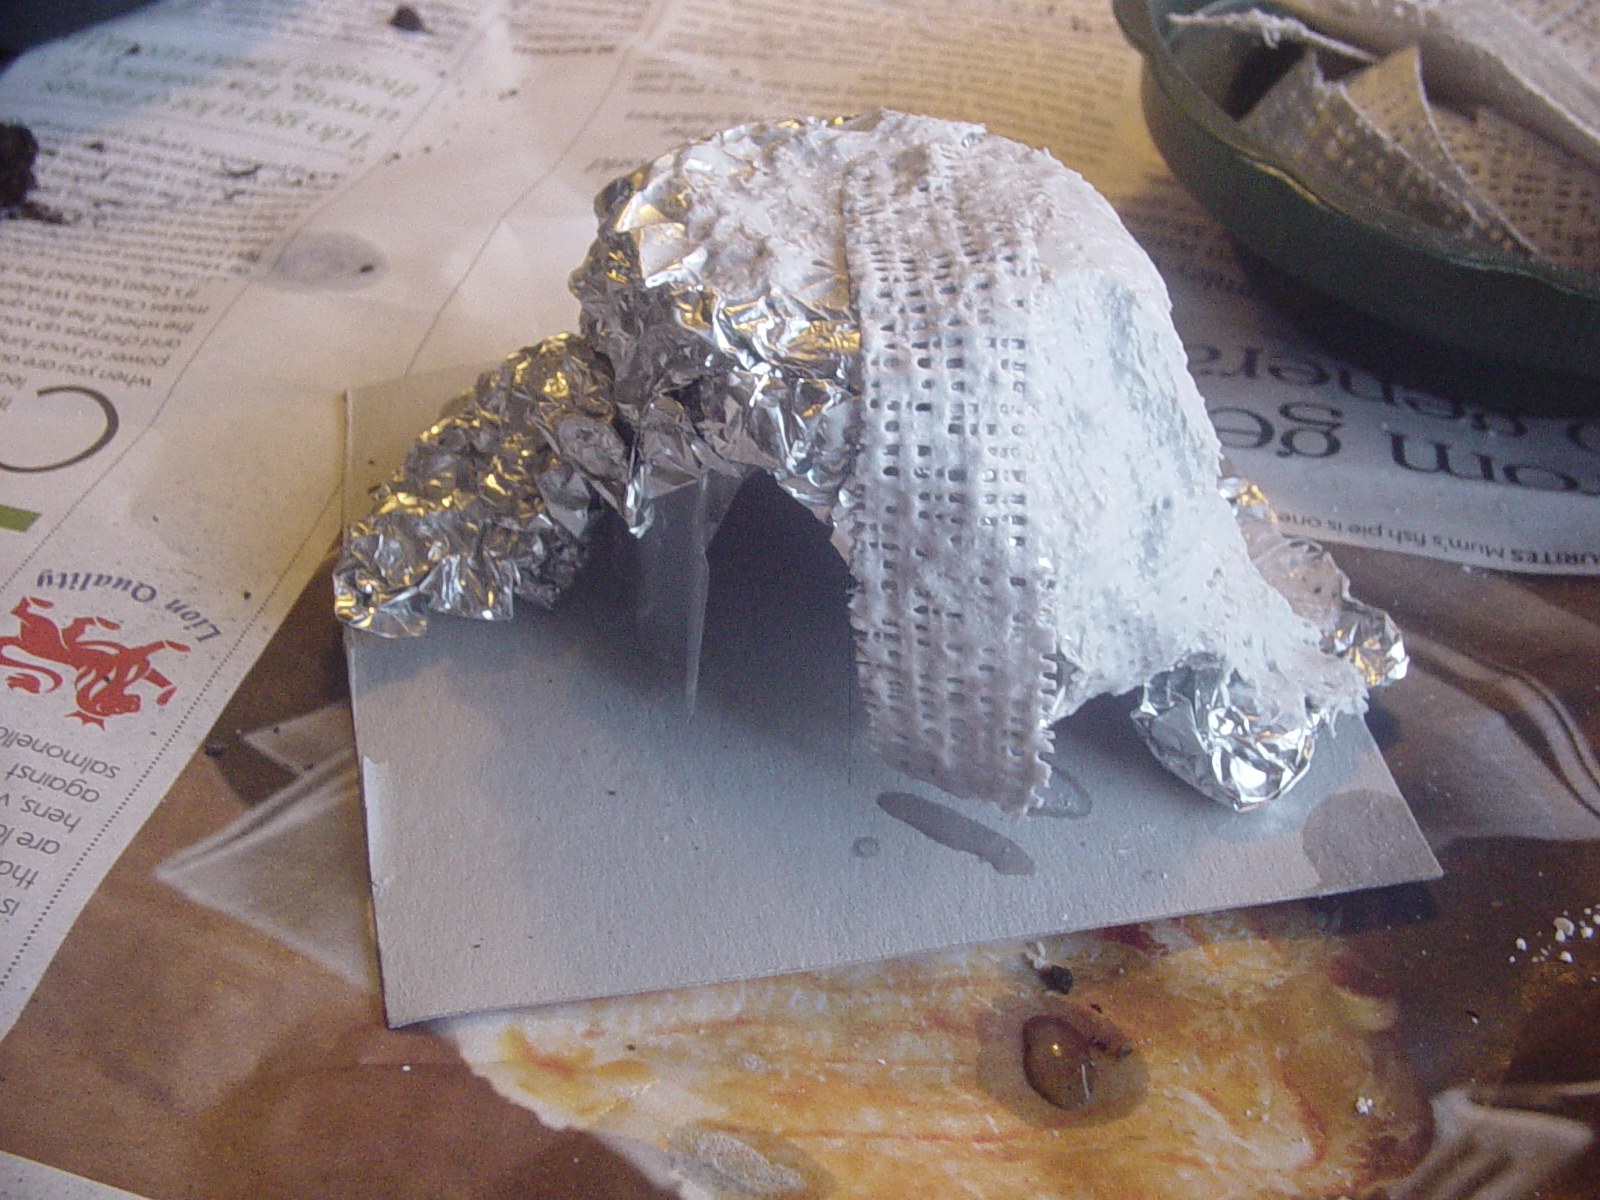
Having filled the containers with soil I then set about making the caves from Mod-roc. If you haven't used Mod-roc before it's like bandage impregnated with plaster. I've used Mod-roc for the first time only a week ago and found it to be a great medium for sculpture.  It could be used as an alternative to papier mache, one benfit for me is that it dries really quickly. To make the cave shape I first covered an upside-down yoghurt pot with foil which I bent into shape. In one bowl I cut up strips of the dry Mod-roc and in another I mixed some water with a bit of black food colouring.  The Mod-roc usually dries white but I wondered whether by adding the colouring I might not have to paint it later. To use the Mod-roc you just dip each strip in the water, gently squeeze off excess water and then apply it to the foil. Once the Mod-roc is on the foil you need to rub the Mod-roc to release the plaster, making the 'holes' disappear.  Though not intended, by the time I had covered the foil I was able to remove the yogurt pot and the cave held its own shape.  I also made four boulders using foil and Mod-roc.


To build up the gardens I positioned the caves first and then simply added in the plants, moss, stones and paths. 


The gardens are not meant to last like this for ever, the small plants should be taken out and will continue to grow in the garden.  It's hard to tell from the photos but the caves came out really well.  The Mod-roc dried with a grey-ish green tinge.  Again I think photos taken in natural light would show up better. It's supposed to be sunny tomorrow, I'll try and take some photos outdoors.


Update: It was sunny, here our outside photos......


Once again thank you to eldest daughter for fabby photos!

Tuesday 3 April 2012

Quilting

Day 36 - Quilting Block

A few weeks ago I had two designs for making a patchwork cushion. I never really got around to using the rabbit design and so I'm re-inventing it to make some quilting blocks. Here are the pieces I had already cut and how they should come together to make a rabbit face. Each square  measures about 4cm without allowing for selvedge. 


Now that I've machine stitched them together this will make the centre of my rabbit quilt block.


I've edged the rabbit block with a lovely green leaf patterned material but I've added something extra to the bottom edge.  Along the bottom edge I have created a small pocket by splitting the strip in two and adding another layer of material to one side. I've placed the pocket piece on top of a green leaf piece and then sewed them both to the other half of the bottom strip.  I've used material from the raw edge and so haven't bothered to hem it. Having finished the bottom strip with pocket, I then sewed on the top and both side pieces.


As I'm busy at the machine I decided to put the front, wadding and back together and quilt the blocks before adding a bias binding edging. I'm machine stitching the front side of the bias binding and I'll hand sew the back.
Note: we were in the middle of a monopoly card game
- multi-tasking! 


To make some carrots to go in the pocket I've simply taken a quarter of a circle of orange felt, folded it in half and stitched it up the side to make a cone shape.  I've turned the carrot inside out and stuffed it. To finish the carrot I've taken a running stitch around the top and pulled it tight whilst slipping in some green felt for the carrot top.  Finally I've secured the green felt in place with a few stitches. Though it sounds easy, it was quite fiddly!


Our bunny needs a face, so I've added a nose and stitched on mouth and whiskers.  I've found some matching buttons for eyes.  For now the carrots can simply sit in the bunny's pocket but I might add a ribbon to stop them from getting lost later.


Yes - I haven't finished the binding and the buttons need fixing in place but I'm off to do those now in front of the telly!

Good night - only 4 more days to go!

Monday 2 April 2012

Wet Felting

Day 35 - Wet Felting

Every now and again there are things I see that I just fancy having a go at - wet felting was one of them.  All you need is bubble wrap, netting, bamboo mat, soap and roving.  Roving is unspun wool and I got mine from Hobbycraft and from a local fabric and craft shop called Abakhan. I suppose the outlay cost for the roving was about £1.50 per colour and I've used six.  Five of these came in a multipack so I picked a pack which I felt would lend itself best to an Easter daffodil theme.


To set up I've put a binbag under where I'll be working, placed the bamboo mat on top and then the bubble wrap on top of the mat. I've started by making the blue and green background.  To do this you tear off strips of roving and lie them on top of the bubble wrap.  When you've done one layer you go over with another layer in the other direction. You can build up three or four layers. To add more interest to the background I've then added in different shades of green and black. I found some shiny feathery blue wool which I've cut up and layered into the sky.  Some people use this technique to make unique sheets of felt which can then be made into other items.  I suppose you could add all sorts of bits to the roving. Another Easter idea has come to me using the colours I've got and feathers!


Once I was happy with the background I placed the netting over the top and used a weak soapy (washing up) solution to wet the roving underneath while flattening it down. 


I then removed the netting and started on the daffodils.  To make the stems and leaves I tore off some roving and twisted or shaped it a little before pressing them on top of the background.  The stems and leaves should soak up some of the excess water from making the background, if not you can add a little more to hold them in place.  To make the daffodils, I've used exactly the same idea, again using a little more soap solution to hold them in place. 


For the daffodil trumpet, I remembered the fluffy yellow wool I'd used to knit the Easter chick and mixed it into a ball of roving before putting it in place on the picture. Now, if I was making a piece of felt to be used for something else I'd have to make everything flat but for a picture I'd like a little bit more texture so I've only pressed the trumpet down in the middle so that the edges will hopefully stand out.


To complete the felting process I put the netting back over the whole picture and then gently rubbed a bar of soap in a circular motion all over for a few minutes. You have to lift the netting every now and again to stop the fibres from sticking to it. Once the felt seems to be really holding together you can lift it off the bubble wrap, put it back down on the bamboo mat and then roll the wet felting up in the mat.  Having placed elastic bands on the ends of the mats I've squeezed out any excess water before starting to roll the mat backwards and forwards for a minute. Once rolled in one direction you unroll the mat, turn the picture round and roll in the other direction. Ideally the picture should fit in your mat!

Here's the picture soaped and rolled


Now the part I was dreading.......Having rolled the felt in the mat and feeling confident that it's holding together, the felt needs to be rinsed in tepid water to remove the soap.  As I've made quite a large picture it was hard to hold and I was very nervous of the whole thing falling apart.  Rather than putting the whole picture in the water I decided to dip the felt bit by bit. Luckily it all held together - hurrah! I rolled it in a towel, again to squeeze out some water and it is now drying.  Later today I will embellish it somehow.  There are a few ways to display it either mounting on a canvas, hanging it straight on the wall or if I'm stitching on it I can use back it with canvas before hanging it.

Looking at the picture again I felt there were a few parts around the edges which weren't truly felted together, I think because they weren't in the mat. So I slightly re-soaped the picture and rolled it again.  This time the picture knitted together a little tighter and shrunk a little so it fit better in the mat.

Once it had dried off I decided to stitch the outline of the daffodil, stems and leaves using the machine and placing a large piece of calico behind it.  I also stitch some extra into the sky to hold it all together.  I still don't know how I'm going to display this! 

I'm pretty pleased with the finished piece 
Finished size is approx 38cmx27cm! 

Update: In fact I was so pleased with the result that I made a miniature version of this as a birthday card for my mum!